The Best Red Velvet Cake Ice Cream Recipe (No Churn)
Have you ever imagined combining the creamy goodness of ice cream with the rich, chocolatey flavor of red velvet cake? If not, you’re in for a treat! Red velvet cake ice cream is the perfect fusion of two beloved desserts, creating a luscious, smooth delight that doesn’t even require an ice cream machine. In this recipe, we’ll dive into how to make a homemade ice cream recipe that’s as beautiful as it is delicious. And don’t worry—there’s a vegan option too!
A Personal Story: Why I Love Red Velvet Cake Ice Cream
Last year, I found myself craving something unique to share on Christmas. I wanted to impress my family with a dessert that was both indulgent and festive. That’s when the idea of homemade red velvet ice cream struck me. I didn’t have an ice cream machine, but that didn’t stop me. I whipped up the best red velvet ice cream cake without churning, and it was an instant hit. The deep beautiful red color, the velvety texture, and the decadent cream cheese frosting swirl were unforgettable.
Why No-Churn Ice Cream?
No-churn ice cream is a game-changer. It’s simple, requires minimal equipment, and yields creamy ice cream that tastes like it came from a fancy local bakery. Plus, who doesn’t love skipping the hassle of an ice cream machine?
Equipment Needed:
- Large bowl
- Electric mixer
- Loaf pan
- Plastic wrap or aluminum foil
- Airtight container for storage
Ingredients for Red Velvet Cake Ice Cream
- 2 cups heavy cream, chilled
- 1 can (14 oz) sweetened condensed milk
- 2 teaspoons vanilla extract
- 1 cup red velvet cake crumbs or leftover red velvet cupcakes
- 4 oz cream cheese, softened to room temperature
- ½ cup powdered sugar
- Red food coloring (optional for that dark red color)
Prep Time and Cook Time
- Prep time: 20 minutes
- Chill time: 6 hours or overnight
- Servings: 6
Step-by-Step Instructions
1. Make the Cream Cheese Mixture
In a large mixing bowl, beat the softened cream cheese with the powdered sugar and vanilla extract using an electric mixer on medium speed until smooth. Set aside. This will be your cream cheese icing swirl, reminiscent of traditional cream cheese frosting.
2. Whip the Heavy Cream
In another large bowl, whip the heavy cream until it forms stiff peaks. This is the base of your ice cream, creating that light, airy texture. If you’re using vanilla bean paste, add it now for an extra layer of flavor.
3. Fold in the Condensed Milk
Gently fold the sweetened condensed milk into the whipped cream, being careful not to deflate the mixture. This is your ice cream base, ready to be transformed into the ultimate red velvet cake ice cream.
4. Add the Red Velvet Crumbs
Stir in the red velvet cake crumbs or cake pieces. For added color, mix in a little bit of red food coloring for that red ice cream hue.
5. Layer and Swirl
Pour half of the ice cream mixture into a loaf pan. Dollop spoonfuls of the cream cheese mixture on top and use the back of a wooden spoon to swirl it throughout. Repeat with the remaining ice cream mixture and cream cheese swirl, creating gorgeous layers of flavor.
6. Freeze Until Firm
Cover the loaf pan with plastic wrap or aluminum foil, and place it in the freezer for at least 6 hours or until firm.
Nutritional Content
| Nutrient | Per Serving (1 cup) |
| Calories | 350 |
| Total Fat | 20g |
| Saturated Fat | 12g |
| Cholesterol | 70mg |
| Sodium | 150mg |
| Total Carbohydrates | 40g |
| Sugars | 35g |
| Protein | 5g |
Vegan Option for Red Velvet Cake Ice Cream
Craving a vegan version? No problem!
Vegan Ingredient Swaps
- Heavy cream: Use full-fat coconut cream.
- Sweetened condensed milk: Swap for coconut condensed milk.
- Cream cheese: Use vegan cream cheese.
Follow the same steps as above, and you’ll have a dairy-free version that’s just as creamy and delicious.
Tips for the Best Red Velvet Ice Cream Cake
- Use leftover cupcakes or red velvet whoopie pies for your cake crumbs.
- Let the ice cream sit out for 5 minutes before scooping for the creamiest texture.
- Store in an airtight container to prevent ice crystals.
Delicious Variations
- Red Velvet Cake Batter Ice Cream: You can easily make a velvet cake using cake batter mix, let it cool completely, crumble it and add to the ice cream base.
- Red Velvet Ice Cream Sandwiches: Spread ice cream between two layers of red velvet cake. Wrap with cling film and freeze for at least 8 hours and up to 1 week. You can make a whole cake sandwich or individual sandwiches of any shape you wish. For the latter, the thickness of the cake should be less. You can coat each individual sandwich with chocolate. Trust me, it’s a hit everytime, especially among children.
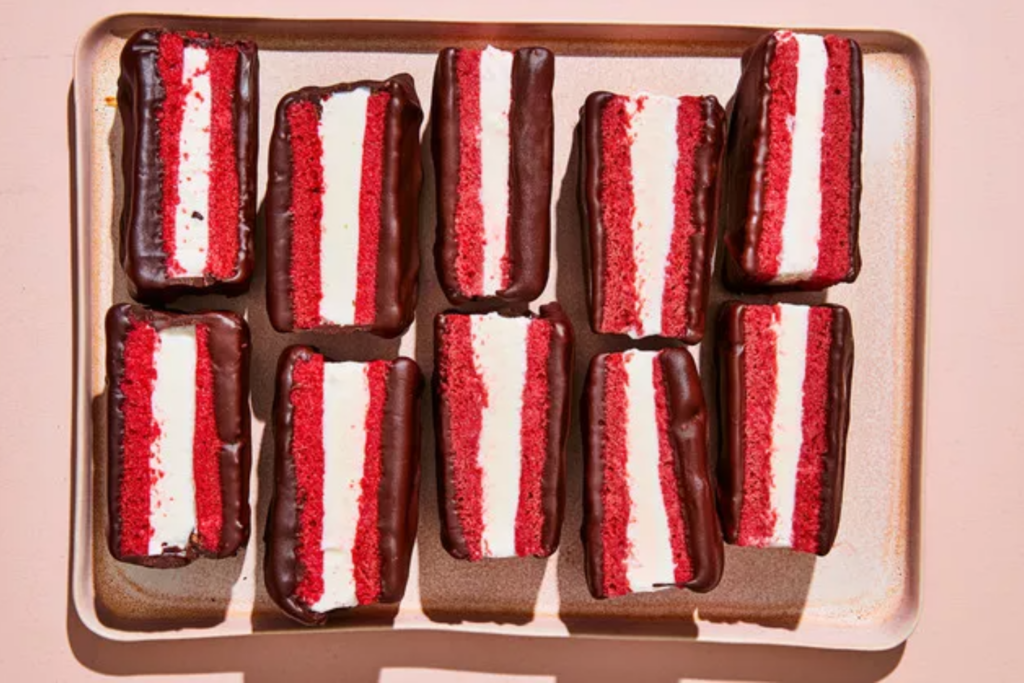
Photo: Christopher Testani
- Chocolate Swirl: Drizzle melted dark chocolate for added richness.
- Valentine’s Day Desserts: Top with heart-shaped sprinkles for festive fun.
Discover Related Recipes
- Easy Mini Strawberry Cheesecake Recipe | Vegan Option
- Easy Jingle Juice Recipe – Christmas & Holiday Punch
- Eggnog Cocktail Recipes | Best Holiday Cocktails
- Christmas Starbucks Drinks | 10 Copycat Holiday Drinks
- Keto Vegan Chocolate Chip Cookies | Sugar & Gluten Free
- How to Make Waffles Without Milk (Dairy-Free Recipes)
- Best Dairy-Free Vanilla Cupcakes (Gluten-Free Option)
- Easy Vegan Eclair Recipe (With Gluten-Free Option)
- Easy Dairy-Free Crepe Recipe (Gluten-Free Option)
- Best Keto French Macarons Recipe | Vegan & Sugar-Free
- Gluten-Free Pumpkin Muffins Recipe (Vegan Option)
- Best Pumpkin Banana Muffins Recipe (Vegan Option)
- Plant-Based Recipe Cookbook
Conclusion: A Scoop of Happiness
There’s something magical about making homemade ice cream. This red velvet cake ice cream is a showstopper with its layers of red velvet cake and creamy, dreamy texture. Whether you’re whipping it up for special occasions or to beat the summer heat, it’s sure to become one of your favorite things. So, grab your large mixing bowl and get ready for one of the best recipes you’ll ever try.

________________________________________
FAQs
1. Can I use store-bought cake for the crumbs?
Yes! Any slice of red velvet cake or leftover cupcakes will work perfectly for this recipe.
2. How long does red velvet ice cream last in the freezer?
Stored in an airtight container, it should last up to two weeks, though it’s so delicious it might not last that long!
3. Can I add chocolate chips to the recipe?
Absolutely! Chocolate chips or chunks would add a delightful crunch.
4. What if I don’t have a loaf pan?
You can use any 8-inch pan.
5. What types of cocoa powder work best for red velvet ice cream?
Use natural or Dutch-processed cocoa for that authentic red velvet flavor.
Enjoy the creamy bliss!
Printable Recipe Card
The Best Red Velvet Cake Ice Cream Recipe (No Churn)
Equipment
- Electric Mixer
- Loaf pan
- Plastic wrap
- Airtight container for storage
Ingredients
- 2 cups heavy cream chilled
- 1 can 14 oz sweetened condensed milk
- 2 teaspoons vanilla extract
- 1 cup red velvet cake crumbs or leftover red velvet cupcakes
- 4 oz cream cheese softened to room temperature
- ½ cup powdered sugar
- Red food coloring optional for that dark red color
Instructions
Make the Cream Cheese Mixture
- In a large mixing bowl, beat the softened cream cheese with the powdered sugar and vanilla extract using an electric mixer on medium speed until smooth. Set aside. This will be your cream cheese icing swirl, reminiscent of traditional cream cheese frosting.
Whip the Heavy Cream
- In another large bowl, whip the heavy cream until it forms stiff peaks. This is the base of your ice cream, creating that light, airy texture. If you’re using vanilla bean paste, add it now for an extra layer of flavor.
Fold in the Condensed Milk
- Gently fold the sweetened condensed milk into the whipped cream, being careful not to deflate the mixture. This is your ice cream base, ready to be transformed into the ultimate red velvet cake ice cream.
Add the Red Velvet Crumbs
- Stir in the red velvet cake crumbs or cake pieces. For added color, mix in a little bit of red food coloring for that red ice cream hue.
Layer and Swirl
- Pour half of the ice cream mixture into a loaf pan. Dollop spoonfuls of the cream cheese mixture on top and use the back of a wooden spoon to swirl it throughout. Repeat with the remaining ice cream mixture and cream cheese swirl, creating gorgeous layers of flavor.
Freeze Until Firm
- Cover the loaf pan with plastic wrap or aluminum foil, and place it in the freezer for at least 6 hours or until firm.
Notes
- Heavy cream: Use full-fat coconut cream.
- Sweetened condensed milk: Swap for coconut condensed milk.
- Cream cheese: Use vegan cream cheese.

