Easy Vegan Crème Brûlée Recipe

I still remember the first time I tasted traditional crème brûlée at a fancy French restaurant. The way my spoon cracked through that perfectly caramelized sugar layer, revealing the silky custard beneath, was pure delight. Years later, when I transitioned to a plant-based lifestyle, I thought I’d have to say goodbye to this elegant dessert forever. That’s when I embarked on a mission to create the perfect easy vegan crème brûlée recipe that would capture all the decadent charm of the original without compromising my values.
The Fascinating Origins of Burnt Cream
The classic french dessert we know as crème brûlée has a rich history dating back centuries. Originally called “burnt cream,” this decadent dessert has its roots in European culinary traditions, with both French and English chefs claiming its invention. The traditional version relies heavily on egg yolks and heavy cream to achieve its signature creamy texture, but as plant-based eating has evolved, so too has our ability to recreate these beloved flavors using simple ingredients.
French recipes have always emphasized technique and precision, and crème brûlée is no exception. The traditional creme brulee requires careful temperature control and timing to achieve the perfect custard base without curdling the eggs. Fortunately, our vegan version eliminates this concern while maintaining all the sophistication of the original.
Why Vegan Crème Brûlée?
Creating a vegan version of this beloved dessert isn’t just about dietary restrictions – it’s about proving that plant-based desserts can be just as luxurious and satisfying as their traditional counterparts. My easy vegan crème brûlée recipe delivers the same creamy custard experience with a crunchy caramelized sugar top that will fool even the most discerning dessert lovers.
Health Benefits of Vegan Crème Brûlée
Vegan desserts often contain more fiber, less saturated fat, and no cholesterol compared to traditional versions. By using full-fat coconut milk and other plant-based ingredients, we’re creating a dessert that’s not only delicious but also more aligned with heart-healthy eating patterns.
Environmental Impact
Choosing vegan recipes reduces our environmental footprint significantly. Plant milk production requires fewer resources than dairy farming, making this decadent crème brûlée a more sustainable choice for special occasions and dinner parties.
Essential Equipment for a Perfect Vegan Crème Brûlée
Before diving into the full recipe, let’s discuss the special equipment you’ll need for best results:
- Kitchen torch or blow torch: Essential for creating that signature crunchy topping
- Heat-proof ramekins: Small individual serving dishes
- Medium-sized saucepan: For heating the custard mixture
- High-speed blender: For achieving the smoothest texture
- Baking sheet: To hold ramekins during baking
- Butane torch or culinary torch: Alternative to kitchen torch
If you don’t have a kitchen torch, you can use your oven’s broiler setting, though the results won’t be quite as precise.
Key Ingredients for Vegan Crème Brûlée
The secret of this vegan custard recipe lies in selecting the right plant-based alternatives that mimic the richness of traditional ingredients.
Choosing the Best Plant Milk
- Full-fat coconut milk: Provides the richest, creamiest base
- Soy milk: Offers good protein content and neutral flavor
- Oat milk: Creates excellent texture and subtle sweetness
- Almond milk: Lighter option, though less creamy
For the most authentic experience, I recommend using coconut cream or full-fat coconut milk as your primary base, supplemented with other plant milk options for flavor complexity.
Thickening Agents That Work
- Agar agar: The key ingredient for proper setting
- Arrowroot starch or arrowroot powder: Adds silky smoothness
- Corn starch: Budget-friendly thickening option
- Silken tofu: Creates incredibly smooth texture when blended
The Complete Vegan Crème Brûlée Recipe
Prep Time: 20 minutes
Cook Time: 15 minutes
Chill Time: 4 hours minimum
Total Time: 4 hours 35 minutes
Servings: 6
Ingredients
For the Custard Base:
- 1½ cups full-fat coconut milk
- ½ cup soy milk
- ⅓ cup coconut sugar
- 3 tablespoons arrowroot starch
- 1 tablespoon agar agar powder
- 2 teaspoons vanilla extract (or 1 vanilla pod, scraped)
- ¼ teaspoon salt
- 2 tablespoons vegan butter
For the Sugar Topping:
- 6 tablespoons white sugar or caster sugar
- Alternative: brown sugar for deeper flavor
Step-by-Step Instructions for Vegan Crème Brûlée
- Prepare Your Ramekins: Place 6 small ramekins on a baking sheet and set aside.
- Create the Base: In a medium saucepan, whisk together coconut sugar, arrowroot starch, and agar agar until no lumps remain.
- Heat the Mixture: Gradually add the full-fat coconut milk and soy milk, whisking constantly. Heat over medium heat, stirring continuously for 5-7 minutes until the mixture begins to thicken.
- Add Flavor: Remove from heat and whisk in vanilla extract, salt, and vegan butter. If using a vanilla pod, scrape the seeds directly into the mixture for enhanced vanilla flavor.
- Blend for Smoothness: Pour the mixture into a high-speed blender and blend for 1-2 minutes until completely smooth and creamy.
- Fill Ramekins: Divide the custard mixture evenly among the heat-proof ramekins, filling each about ¾ full.
- Chill: Cover each ramekin with plastic wrap and refrigerate for at least 4 hours or overnight for best results.
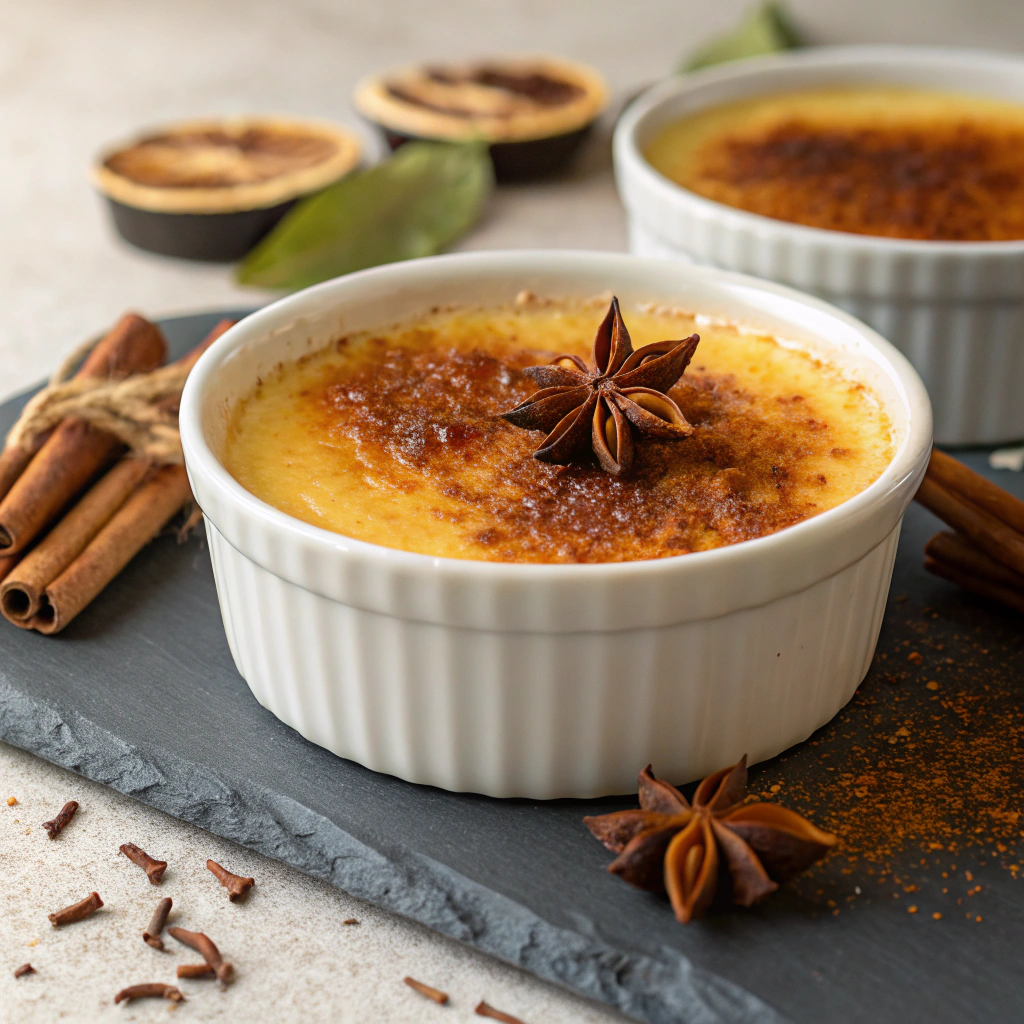
- Create the Topping: Just before serving, remove plastic wrap and sprinkle a thin layer of white sugar evenly across the top of each custard.
- Caramelize: Using your kitchen torch, heat the sugar in circular motions until it melts and turns golden brown. The sugar should form a crunchy caramelized sugar layer.
- Final Touch: Allow the caramelized topping to cool for 1-2 minutes before serving.
Gluten-Free and Dietary Adaptations
The basic vegan crème brûlée recipe is naturally gluten-free, but here are additional adaptations:
Sugar-Free Version
Replace coconut sugar with equal amounts of maple syrup or stevia. For the caramelized top, use coconut sugar or a sugar-free caramelizing blend.
Nut-Free Option
Use oat milk or soy milk instead of any nut-based alternatives. Ensure your plant milk is certified nut-free if allergies are a concern.
Soy-Free Variation
Replace soy milk with additional coconut cream or your preferred plant milk. The texture will be slightly different but equally delicious.
Creative Variations and Add-Ons for Vegan Crème Brûlée
Flavor Variations
Chocolate Vegan Crème Brûlée: Add 3 tablespoons of cocoa powder to the custard base for a rich chocolate version.
Coffee-Infused: Replace ½ cup of plant milk with strong cold coffee for a sophisticated coffee flavor.
Citrus Twist: Add lemon or orange zest for a bright, refreshing variation.
Seasonal Adaptations
Autumn Spice: Incorporate cinnamon, nutmeg, and a touch of pumpkin spice for fall dinner parties.
Berry Infusion: Blend fresh berries into the custard base for natural color and flavor.
Professional Tips for Perfect Vegan Crème Brûlée
Temperature Control
Heat your custard mixture over medium heat to prevent scorching. The key to achieving the perfect creamy texture is patience – never rush the heating process.
Achieving the Ideal Consistency
The custard should coat the back of a spoon when properly thickened. If it’s too thin, whisk in a bit more arrowroot powder dissolved in cold plant milk.
Torch Technique
Hold your blow torch at a 45-degree angle, moving in small circles. Keep the flame moving to prevent burning any one spot. The sugar should bubble and turn golden brown evenly across the surface.
Serving Suggestions and Presentation for Vegan Crème Brûlée
This elegant dessert deserves special presentation. Serve your vegan crème brûlée at room temperature after removing from the refrigerator for 10-15 minutes. The contrast between the cool custard and the warm, crunchy topping is part of the authentic experience.
Garnish Ideas

- Fresh berries for color and tartness
- Mint leaves for visual appeal
- Edible flowers for special occasions
- A light dusting of vanilla bean paste around the plate
Wine Pairings
Pair this decadent dessert with a sweet dessert wine, champagne, or even a rich coffee for the perfect ending to dinner parties.
Storage and Make-Ahead Tips
The custard base can be made up to 3 days in advance and stored in the refrigerator. However, only caramelize the sugar topping just before serving to maintain its signature crunch. Cover custards with plastic wrap to prevent a skin from forming on top.
Troubleshooting Common Issues for Vegan Crème Brûlée
Custard Won’t Set
If your custard remains too liquid after chilling, you may need more agar agar. The next step is to gently reheat the mixture and add an additional teaspoon of agar agar dissolved in hot plant milk.
Grainy Texture
A grainy texture usually results from not blending long enough or using insufficient liquid. Always use a high-speed blender for the smoothest results.
Sugar Won’t Caramelize
Ensure your custard surface is completely dry before adding sugar. Pat gently with a paper towel if needed. Use caster sugar for easier caramelization than regular granulated sugar.
Nutritional Information for Vegan Crème Brûlée
| Nutrient | Per Serving |
| Calories | 245 |
| Total Fat | 18g |
| Saturated Fat | 15g |
| Carbohydrates | 20g |
| Fiber | 1g |
| Sugar | 18g |
| Protein | 3g |
| Sodium | 125mg |
Nutritional values are approximate and may vary based on specific ingredients used.
The Science Behind Vegan Custards
Understanding the science helps perfect your technique. Agar agar, derived from seaweed, sets at room temperature unlike gelatin, making it perfect for plant-based custards. The combination of agar agar and arrowroot starch creates the ideal texture that mimics traditional egg-based custards without any compromise in quality.
Special Occasions and Presentation Ideas for Vegan Crème Brûlée
This elegant dessert is perfect for impressing guests at dinner parties, romantic dinners, or holiday celebrations. The individual serving size makes it ideal for portion control while maintaining the luxurious feel of restaurant-quality desserts.
Consider creating a dessert station where guests can choose their own toppings or watch you demonstrate the torching technique – it’s always a crowd-pleaser and conversation starter.
See also my must-try Vegan Eclair Recipe
For other Plant-Based Desserts, click here.
Conclusion
Creating the perfect vegan crème brûlée doesn’t require sacrificing flavor or sophistication. This easy recipe proves that plant-based desserts can rival any traditional version while being more inclusive and environmentally conscious. The combination of creamy custard, achieved through carefully selected plant-based ingredients, and that signature crunchy caramelized sugar creates an experience that honors the classic while embracing modern dietary preferences.
Whether you’re hosting dinner parties, celebrating special occasions, or simply treating yourself to something special, this vegan crème brûlée recipe delivers restaurant-quality results in your own kitchen. The only thing better than the taste is knowing you’ve created something beautiful, delicious, and aligned with your values.
Remember, the key to success lies in patience, quality ingredients, and proper technique. With practice, you’ll be creating picture-perfect vegan crème brûlée that will have everyone asking for the recipe. This decadent crème brûlée proves that the real thing can be plant-based without compromise.
Frequently Asked Questions
Q: Can I make this vegan crème brûlée without a kitchen torch?
A: Yes! You can use your oven broiler setting instead. Place the sugar-topped ramekins under the broiler for 1-2 minutes, watching carefully to prevent burning. The results won’t be as precise as with a culinary torch, but you’ll still achieve a caramelized topping.
Q: How long does homemade vegan crème brûlée last in the refrigerator?
A: The custard base will keep for up to 4 days in the refrigerator when properly covered. However, only add and caramelize the sugar topping just before serving to maintain the crunchy texture that makes this dessert special.
Q: Can I substitute the coconut milk with other plant milk options?
A: While you can use other plant milk alternatives like oat milk or almond milk, full-fat coconut milk provides the richest, most authentic texture. If using lighter plant milk, you may need to add extra thickening agents like arrowroot starch for proper consistency.
Q: Is this recipe suitable for people with nut allergies?
A: The basic recipe using coconut milk and soy milk is nut-free, but always check your specific plant milk labels to ensure they’re processed in nut-free facilities if allergies are a serious concern.
Q: What’s the best way to achieve an even layer of caramelized sugar?
A: Sprinkle the sugar in a thin, even layer across the entire surface of each custard. Use your kitchen torch in small circular motions, keeping it moving constantly to prevent hot spots. The sugar should bubble and turn golden brown uniformly across the top of each custard.